JavaScript dataframe(data science in the browser)
Table Of Contents
Intro
Please note this article will not cover statistical or exploratory data analysis. but is an introduction to bokke.js: an overview of functionality and features, but I do plan to do EDA and building ML models in JS articles next. more details in the Conclusion
dependencies
these are dependencies used underneath, wabt not so much(but will in the coming updates)
- chartjs - handles all the charting
- wabt - (will or)handles web assembly modules
Note: bokke.js was a spur of a moment thing, still a work in progress, but can do most things a "dataframe" can, an added bonus: it is non blocking(well most parts), heavy calculations and table creations are isolated from the main thread, handled separately.
Installation
npm i bokke.js
Basics
a dataframe is a tabular view of data, presenting an API to interact with that said data, this definition is not standard, it's the best I can think of right now. if you come from the python world you may know pandas which somewhat inspired this module.
Reading a File
for now, only csv files are supported, support for more files is loading, and to rephrase not csv as in file only, as in values: comma separated values(text) to be exact. to load data you pass in a file object with a file containing comma separated values
File: Index.html
<input type="file" id="csv">
I personally use the dev tools console to interact with the dataFrame as you can see below and I do recommend it, its way faster and the changes are live compared to the editor, having to save and reload everything.

in your JS file import dataframe
import dataFrame from "bokke.js";
reference the file input and on file change pass the returned file object to dataFrame
let file = document.getElementById("csv")


file.onchange = e => {
     // pass the actual file element
     // and a callback which will be called when the dataframe is ready returning the frame object
     dataframe(file, (frame)=> {


     })

 }
// you can pass an Array as a third parameter with column names
Callback function
the callback function is called by dataframe, passing in as a parameter a frame object, an object containing all functionality and access to the dataframe, simply: Frame API
API example:
frame.head(10) // return first 10 rows
frame.tail(8) // last 8 rows
frame.scatterM() // charts a matrix scatter plot for columns of type number
But first to interact with the frame, an HTML element(ref to it) is needed by the frame to "draw/append" the computed table
index.html :
<div id="table">

    // table will be appended here


</div>
the frame object has a table variable containing a template string representing a table, which you can assign to an element, as shown below
 file.onchange = e => {

      dataframe(file, (frame)=> {
          // assigning frame.table to a div element
         document.getElementById("table").innerHTML = frame.table

    })

  }
for our purpose let's assign the frame object to the window, so it can be accessed in the dev console, for context I am using brave, compared to firefox brave allows re-declaring variables.
 file.onchange = e => {

      dataframe(file, (frame)=> {
      // creating variable frame_ in the browser global object
      window.frame_ = frame
    })

  }
accessing frame from the dev console
const df = window.frame_
Learning by example
example's are the best way to learn a new tool or concept, we are going use the automobile dataset. download the datasets and put them somewhere accessible
- reading the data
index.html
<!DOCTYPE html>

<html lang="en">

<head>

 <meta charset="UTF-8">

 <meta http-equiv="X-UA-Compatible" content="IE=edge">

 <meta name="viewport" content="width=device-width, initial-scale=1.0">

 <title>Document</title>


 <style>

 table {

 border-collapse: collapse;

 margin-top: 10px;

 width: 100%;

 }


 table th {

 text-align: center;

 background-color: #3e6070;

 color: #fff;

 padding: 4px 30px 4px 2px;

 }


 table td {

 border: 1px solid #e3e3e3;

 padding: 4px 8px;

 }


 table tr:nth-child(odd) td {

 background-color: #e7edf0;

 }

 </style>

</head>

<body>

 <input type="file" id="csv">


 <div id="table">


 </div>


 <div id="har">


 </div>


 <script src="main.js"></script>

</body>

</html>
main.js
import dataFrame from "bokke.js";


let file = document.getElementById("csv")


file.onchange = e => {

 dataFrame(file, (frame)=> {


   document.getElementById("table").innerHTML = frame.table

   window.frame_ = frame


 },)

 }
a table like the one below should show up in the browser, we can now move from the editor to web console

let's begin with some prep, to avoid repetition, there is one callback we need to call most of the time, which receives an updated frame after manipulation
in the dev console: note every line is a seperate "command" in the console
const df = window.frame_

const tbl = document.getElementById("table")  // ref to the table div

let df2 = undefined

function callback(frame){

  tbl.innerHTML = frame.table;   // update the table with the new one
  df2 = frame   // assign the new data frame(will become clear later)

}

basics
dev Console:
// the first column is an index col, automobile data comes with its own, while dataframe appends it's own index col in the beginning, we will see how to drop them later

df.shape    // return rows * columns [206, 28] 28 columns and 206 rows
df.columns   // array of all the column names


df.head(7, callback)   // update the table to show the first 7 rows, head calls callback(passing a new frame as a parameter every frame object has the frame.table var which contains the table template the callback we defined above handles everything plus assigning the new DF to df2 should we need to interact with the copy of df with 7 rows)

df.tail(10, callback) // last 10 values

df.slice(1, 27, callback)   // parameters start - end, return row 1 to 27
More basics:
still in Console:
// there are functions that do not return a frame, rather the table itself,
//isNull is one of those, hence we need a second callback to handle such cases

function callback2(table){ tbl.innerHTML = table} // update the table only

df.isNull(callback2)

/*
   the table will be filled with true or false, true meaning data is missing,

   for now this is not as much useful and buggy,
   I plan to change it to a frame so it can be interactive and useful
*/


// parameter 1 is inplace: true means update the actual frame(df), while false, means return a copy, with rows that have NaN dropped
df.dropna(true, callback) // drop all rows with NaN in the actual(df) frame
Every thing is done in the console from now on
Query, getCol and Drop
Query
is a proxy, to emulate "natural" array[] indexing, more syntax side than behavior,
// Fisrt step create, the proxy object
const q = df.query()

// then query for rows

// single row
q[1]  // [1, 1, 3, '?', 'alfa-romero', 'gas', 'std', 'two', 'convertible', 'rwd', 'front', 88.6, 168.8, 64.1, 48.8, 2548, 'dohc', 'four', 130, 'mpfi', 3.47, 2.68, 9, 111, 5000, 21, 27, 16500]


// multiple rows

q[[1, 10, 20, 30]] // returns row 1 10 20 30 (Array of arrays)
For now that is the capability of query
getCol
returns a "class" series - not implemented at the moment, but you can access the column data.
   df.getCol("make")     //Series {data: Array(206)}

   // access the data directly
   df.getCol("make").data // return the column as Array<any>
Drop
drop specified columns and rows inplace or returns a new frame.
Inplace:
df.drop(true, callback,204, " ") // drop row 204 and the column with an empty title(removing duplicate index column)
Note: after the callback param in drop, you can pass as many arguments as you want, for example
df.drop(true, callback, 1, 2,3,4,5,6,7, "aspiration") // row 1 to 7 plus column row will be dropped
also if you notice the index column does not reset, you can reset it manually using:
df.reset(callback)
The reason for manual reset, is auto reset may reset even after you dropped the index column, which affect whatever column is first and will change it to indices, since indices are not separate from the frame
!inPlace:
df.drop(false, callback,1, 2, 3, 4, 5, 6) // first param is false, a new frame will be assigned to df2 with the drop result applied, while the original frame is not affected
to see this in action, after dropping, you can revert back to the original frame, by assigning it's table directly to the tbl.innerHTML var (what the callback functions do)
tbl.innerHTML = df.table // reverting back to the original table
Unique, Count and Rename
Unique
returns an array of all unique values in a column
df.unique("make") // takes a column as a param and returns ['alfa-romero', 'audi', 'bmw', 'chevrolet', 'dodge', 'honda', 'isuzu', 'jaguar', 'mazda', 'mercedes-benz', 'mercury', 'mitsubishi', 'nissan', 'peugot', 'plymouth', 'porsche', 'renault', 'saab', 'subaru', 'toyota', 'volkswagen', 'volvo', undefined] of unique values
Count
returns an object counting occurrence/frequency of each value
df.counter("make") // {alfa-romero: 3, audi: 7, bmw: 8, chevrolet: 3, dodge: 9, …}
Rename
renames a column
df.rename("horsepower", "horse-power", callback) // first param is the col to rename, second param is what to rename it to, callback is the usual callback
Map and Replace
Map
Map values to another values, helpful when changing text data to numbers e.g (Female, Male),
//parameters: values to map {from: to} e.g {"Bmw": 1}, column, callback, inPlace(boolean)
df.map({"alfa-romero": 1, "audi": 2, "bmw":3, "chevrolet": 4, "dogde": 5}, "make", callback, false)
// all the specified from values will change to their to's
Note: map may not always work, especially maping from numbers, this actually due the feature of object taking strings as key's, so if you pass a number as a key, it may be passed into a string, 0 !== "0", something I will look into soon, maybe use Maps.
Replace
replaces a specific value in the entire dataframe, e.g the automobile data has "?" representing nulls/or empty fields, whilst dataframe only understands "NaN", we can replace all "?" by "NaN"
// params: 1 toReplace, 2 replace with, 3 callback, 4 inplace bool
df.replace("?", "NaN", callback, true) // replace all "?" with "NaN"
a note on NaN, js has a native NaN value, the reason I chose to represent it as a string is in JS NaN === NaN = false, so checking for NaN values would be impossible

Apply along axis
apply's a function in the specified axes, 0 being rows and 1 column,
// NB the function must return a value
// the function takes a cell(value) which is IJ in the dataframe

function applyEg(val){
    if(typeof val === "number"){
        return Math.sqrt(val)
    }
    else
        return val
}


// applyEg takes in a value if it's a number returns a sqr root of that number, else return the actual value

/*

parameters

apply_along_axis(axis, fn, where, callback, inplace)

axis - 0 stands for rows, 1 for a single column
fn - function to apply which returns a value(e.g: applyEg)

where - depends on axis, if axis equal 1, where must be a string for a column, else a number for a row or all for all rows

*/

df.apply_along_axis(1, applyEg, "price",callback,true) // apply fn on the price column(Inplace)


df.apply_along_axis(0, applyEg, 1,callback,true) // apply fn on row 1 coming soon!! don't use

df.apply_along_axis(0, applyEg,"all" ,callback,true) // apply fn on all rows
in a nutshell that is apply_along_axis, another example let's square "back" the rooted values, change applyEg from sqrt to pow of 2
function applyEg(val){
    if(typeof val === "number"){
        return Math.floor(Math.pow(val, 2))
    }
    else
        return val
}

df.apply_along_axis(0, applyEg,"all" ,callback,true)
df.apply_along_axis(1, applyEg, "price",callback,true)

// we should be back where we started
NewCol
newCol is especially useful to patch most shortcomings of dataframe, with the combination of getCol and newCol, you can do a lot of things that dataframe cannot do initially, for example adding two columns, performing stats analysis on the entire column and appending it back to the frame etc
example adding columns:
// assuming you have dropped row 205 if not do drop it, which has lots of nulls and NaN
// let's add city-mpg and highway-mpg together(this has no meaning whatsover just an example)


function addarr(arr1, arr2){
    let temp = []
    for(let i = 0; i < arr1.length; i++){
        temp.push(arr1[i] + arr2[i])
    }
    return temp
}  // adds two arrays together and returns the result

/*

parameters:

df.newCol(column, name, type, callback)
1. column (array) - column to add
2. name - column name
3. type - e.g number, string, etc of the column
4. callback
*/

df.newCol(addarr(df.getCol("city-mpg").data, df.getCol("highway-mpg").data), "mpg", "number", callback)
as simple as that we have a new column.
Group_by
Predicate - a function that returns true or false based on a condition,
In case of group_by true means the row met the requirements and is added to the group.
example: grouping all Bmw's
function predicate(val){
    if(val === "bmw")
        return true
    else
        return false
}

/*
group_by(column, predicate, callback)

for each value in the column groupby will run predicate
if predicate returns true, the row is added as part of the group
else the row is passed

*/

df.group_by("make", predicate, callback)  // getting all bmw rows

/*
you can access this "sub" dataframe in df2, as callback assigns it to df2
*/
There are 8 bmw's, you can prove this by using counter in the original df
df.counter("make") //{alfa-romero: 3, audi: 7, bmw: 8, chevrolet: 3, dodge: 9, …}
reseting the index column in df2
df2.reset(callback) // indices for the bmw's group
you can make your predicate function as narrow or wide as you want as long as it returns true or false for each operation
function predicate(val){
    if(val === "bmw"  || val === "volvo")  // getting rows of bms and volvo's
        return true
    else
        return false
}
Scatter matrix and basic stats
for these functions not a lot is required from you, just calling them, they compute everything internally
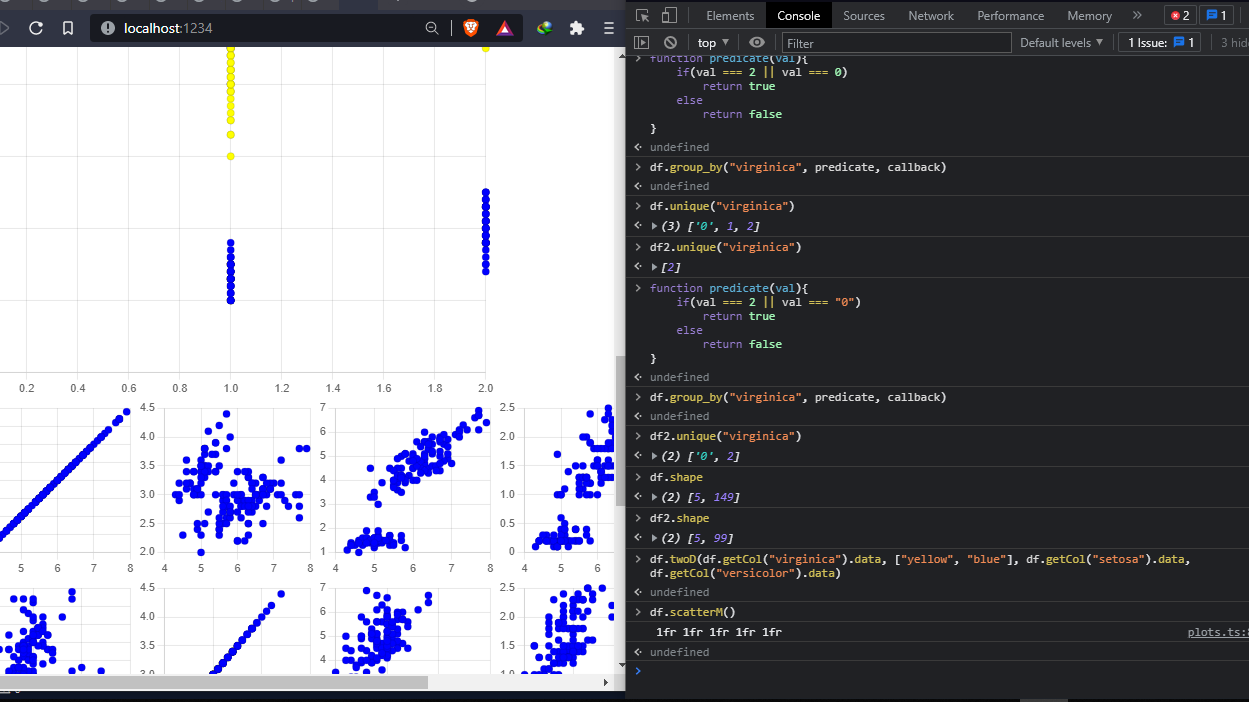
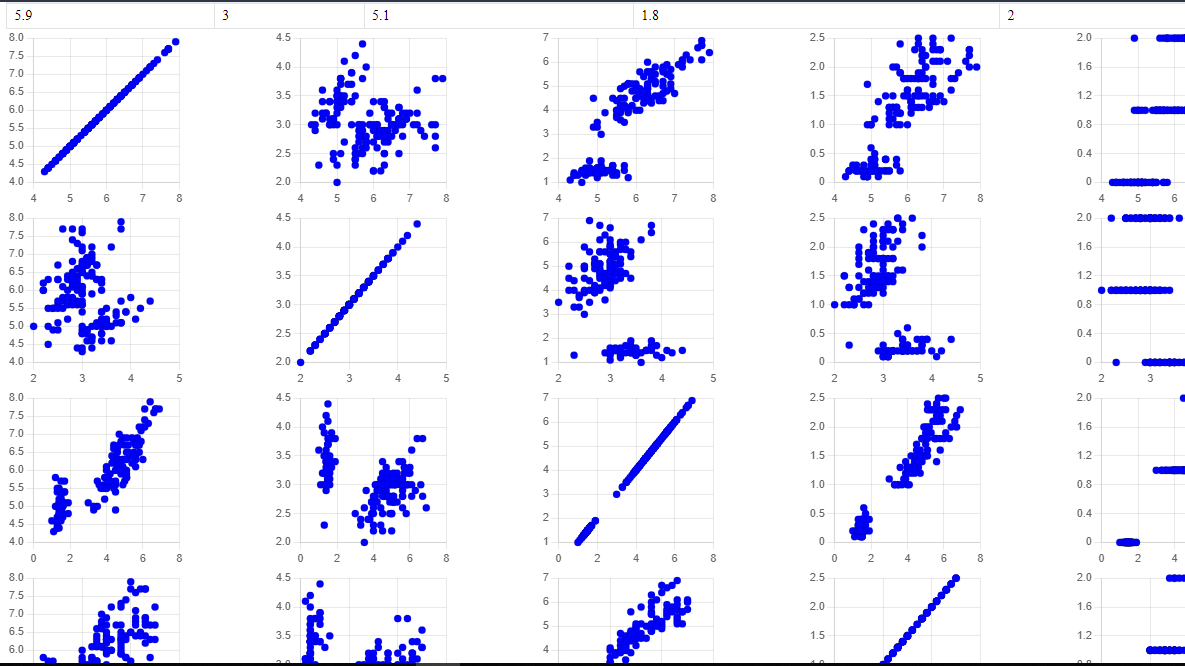
Scatter matrix - the more columns you have the longer it will take for example for 12 columns, a scatter matrix will be 12 by 12 charts(and note threads cannot handle the DOM and chart js uses canvas so becareful on the number of columns, as they use the main thread they can block your browser), secondly scatterM makes an assumption that your data is clean: meaning there are only numbers in all columns, cleaning the automibile dataset will take effort and time, so download the iris dataset, which is much simpler and already "clean".
open the iris file, and setup the console
const df = window.frame_
const tbl = document.getElementById("table")
let df2
function callback(frame){ tbl.innerHTML = frame.table; df2 = frame}
function callback2(table){ tbl.innerHTML = table}
Scatter matrix
simply each column is plotted against all other columns, useful for spotting "relation" between columns
first drop row 150 and the index column(index column is not data)
df.drop(false, callback,150, " ") // not inplace
plot the scatter matrix
// scatterM
df2.scatterM()  // plot the matrix

Basic stats
compute basic stats for the dataframe
few preparations
df.drop(false, callback,' ', 150) // drop the index column and row 150
df2.unique("virginica") //  ['0', 1, 2] we need to replace that "0" to 0
df2.replace("0", 0, callback, true)

// computing stats
df2.basicStat()  // for now stats are console tabled that will change soon, for now they are basic

hist and Scatter plot
Histogram
back to the automobile data, which is visually interesting to visualize, since there are large values and variance, load the automobile dataset again and do all set up, (const df, tbl etc)
only drop row 205
df.drop(true, callback,205)

df.replace("?",0, callback, true) // replace all "?" with 0 just in case price has "?"
Plot the hist
df.hist(500, "hist", df.getCol("price").data) // first param is the bin/bucket size,
//second title, 3rd the data to plot

Scatter
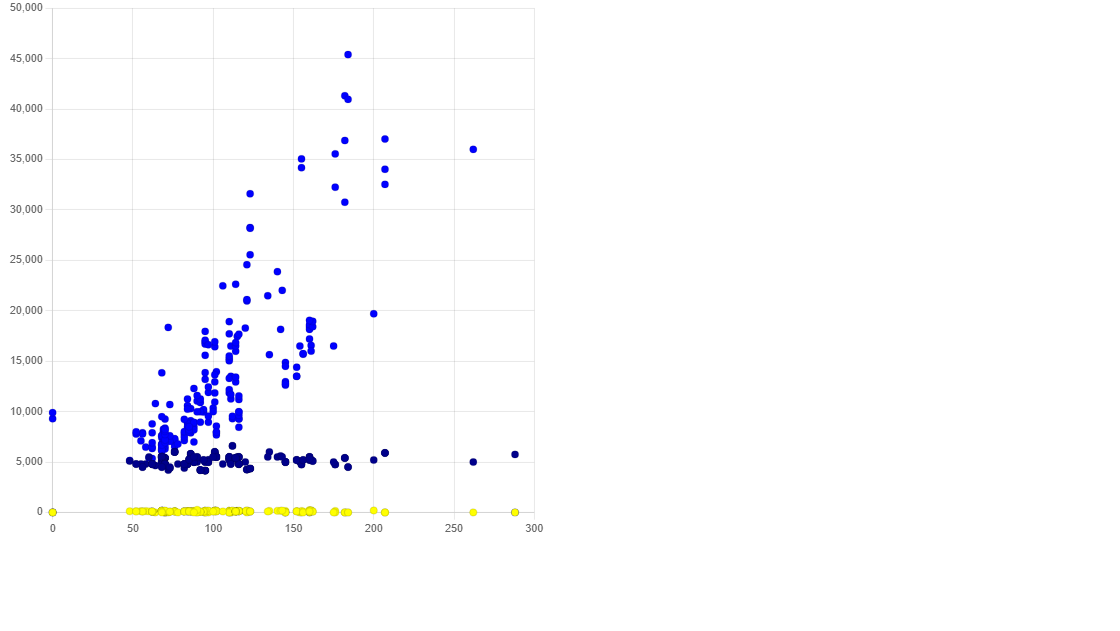
comparing multiple values,
/*
scatter(x-axis, [color for each y axis], ...values(y-axis))


x-axis is the independent variable to plot against.
y-axis can be one or more arrays to plot against x

colors- an array must be the length of y-axis, each color corresponds to each y-axis (Hex supported)
*/

// plotting xs(horsepower) ys[price,peak-rpm, normalized-losses]


df.scatter(df.getCol("horsepower").data, ["yellow","darkblue", "blue"], df.getCol("normalized-losses").data, df.getCol("peak-rpm").data, df.getCol("price").data)


/*
  yellow = normalize-losses
  darkblue = peak-rpm
  blue = price

*/

writeCsv
write a dataframe to a csv file
df.writeCSV('name')
Conclusion
this was a quick intro to bokke.js dataframe, thank you for reading and your interest, I am planning to do exploratory data analysis next, shortly followed by creating ML models in JS from the ground up, the best way to learn is from scratch, well sometimes anyway.
If you want to be notified or updated on bokke.js and other articles the best way is on twitter, I am planning to use twitter for updates and articles, you can find me here:
In terms of the source code I am planning on committing it to git soon, but as I stated earlier this was a spur of a moment thing, no tests, code all over the place, abs no comments, as soon as I am done refactoring, it will be up, honestly will probably take a while, cause I am working on other projects, so please bare w/ me if you are interested in the source

