Compiling our Express Server with Webpack
In this article we're going to setup Server side rendering by processing even server files with webpack. We'll set webpack to a new target. Node. This will let us compile more than just Javascript on the server-side.
We're going to start where we left off inthe last article If you need to catch up:
git clone https://github.com/lawwantsin/webpack-course.git
cd webpack-course
git checkout ssr-webpack
npm install
Webpack Target Node
So last time we tried to render our AppRoot component we ran into a problem. Node, Babel and Express with all there power, doesn't understand images or markdown. Node is able to require them, or import them in ES6, but Node is always expecting Javascript, so it tosses the image to the Javascript compiler and this happens.

Cool, right. So, turns out this is pretty solvable. There are a few solutions like webpack-isomorphic-tools that hijack the require statement and replace it, in node on the server-side. And while that's cool, it's also deprecated, since target: "node" came to webpack configuration.
Target Node
What we need to do is use webpack to process express.js, so that images and markdown are properly handled and then run the new file with node. We'll want to create a new "server" config and add a new package.
touch config/webpack.server.js
npm install webpack-node-externals
Add the following to config/webpack.server.js:
const path = require("path")
const webpack = require("webpack")
const ExtractTextPlugin = require("extract-text-webpack-plugin")
var nodeExternals = require("webpack-node-externals") module.exports = env => { return { target: "node", externals: nodeExternals(), entry: { server: ["./src/server/main.js"] }, output: { filename: "[name]-bundle.js", path: path.resolve(__dirname, "../build"), }, module: { rules: [{ test: /\.js$/, exclude: /node_modules/, use: [ { loader: "babel-loader" }] }, { test: /\.css$/, use: ExtractTextPlugin.extract({ fallback: "style-loader", use: { loader: "css-loader", options: { minimize: true } } }) }, { test: /\.jpg$/, use: [{ loader: "file-loader", options: { name: "/images/[name].[ext]", } } ] }, { test: /\.md$/, use: [{ loader: "markdown-with-front-matter-loader" }] } ] }, plugins: [new ExtractTextPlugin("[name].css"), new webpack.DefinePlugin({ "process.env": { NODE_ENV: JSON.stringify(env.NODE_ENV) } }), new webpack.NamedModulesPlugin() ] }
}
Cool. So, notice the first 2 lines of our config.
target: "node",
externals: nodeExternals(),
This is the crux of the difference. With target node, we're telling webpack to bundle our assets for node instead of the web. target: "web" is the default target. This change allows webpack to grow with the ever changing world ofdevice targets.
Externals means, what is webpack going to not bundle at compile time. Theexternals option could be as simple as /node_modules/. In this case we're employing a function that's imported form the webpack-node-externals package. This will bring our bundles way down, and still load all the packages at runtime using the normal node require().
In the output section we're adding a new folder, the build folder, so the compiled bundle, doesn't sit in a public directory like dist. So in the terminal:
mkdir build
In package.json, we're going to update our scripts.
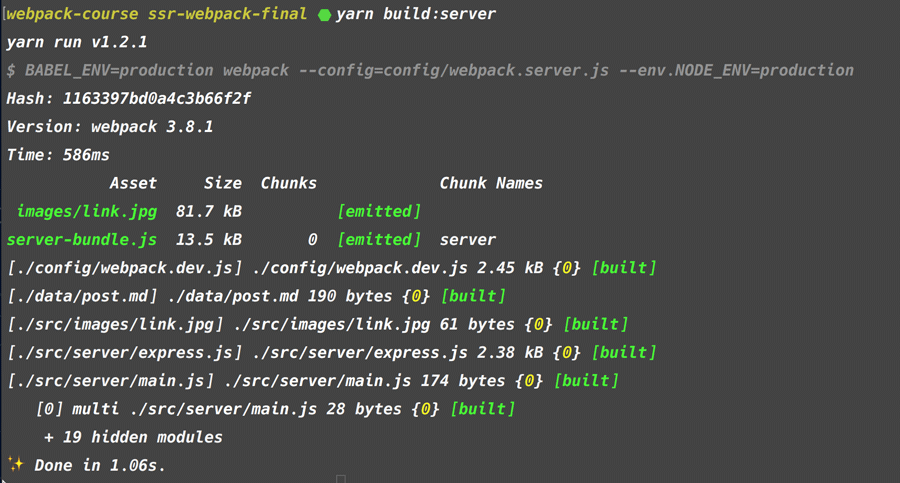
"build:server": "BABEL_ENV=production webpack --config=config/webpack.server.js --env.NODE_ENV=production",
Now run:
npm run build:server
To take express.js and turn it into server-bundle.js.

In your build directory, you'll find a server-bundle.js and an images folder.
Now we're going to change our prod script in package.json to point at this new file.
"prod": "NODE_ENV=production node build/server-bundle.js",
We can remove the hacky stuff in AppRoot.js at the top and replace it with normal requires.
const MarkdownData = require("../../data/post.md")
const imagePath = require("../images/link.jpg")
So, if we run npm run dev we should see the index.ejs and main-bundle.jshot reloading as usual. Style tags are injected via the style loader.
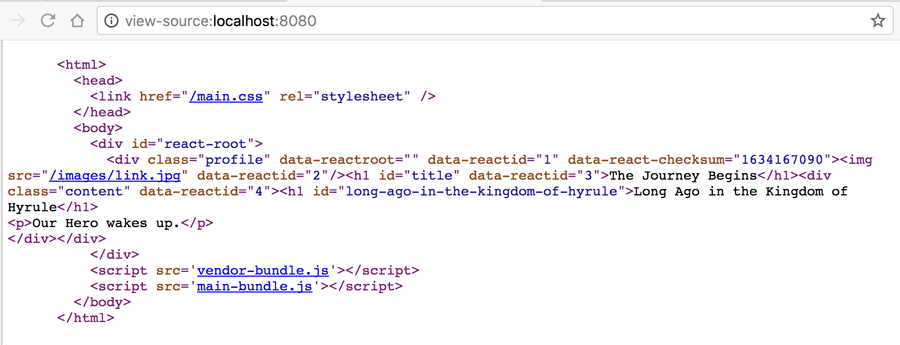
If we run npm run build:server and npm run prod we run the server and see the markdown right in the html.

Let's also do this on the development side. In package.json:
"dev": "node --inspect build/server-bundle.js"
And lastly, we have an extra file emitted on server build. The image. Let's change webpack.server.js to not emit that file.
{ test: /\.jpg$/, use: [{ loader: "file-loader", options: { name: "/images/[name].[ext]", emitFile: false } } ]
},
In Sum
We did it. We openned the door to yet another use for Webpack. It can compile server code with a node build target to incorporate all file types the loaders allow. With a new config file, we create a server bundle that includes markdown and other assets types in the render. We can use the same server config in production and development for now, but we'll see how to break those up and why.
git checkout ssr-webpack-final
Up Next
In our effort to build the ultimate webpack boilerplate, we're still not totally there. One thing that's hindering our progress is, we've been using webpack only from the command line. In the next episode, we're going to look at using webpack as a javascript function to start and restart our server after webpack compilation. This next step separates the pros from those that never learn the true power of webpack. Stay tuned.
