ReactJs Animation: Create login/register form with react-spring animation
Web animation is always a hot topic. For the development of reactjs apps, you have a vast array of options to implement animations. You can see examples on the web that demonstrate their capabilities, like the ones shown here :
For the purpose of this article, I have compiled a handful of the options available to you (there are much much more than 5 listed here). My list of react animation methods are listed below: :
CSS method - Use basic css styles, so no react coding needed
React-transition-group — This is an add-on component that features basic CSS animations and transitions.
React Motion - This is a popular library for React. The animations created look natural and use physics concepts to provide a realistic feel
React-spring - is another physics-based animation library that has advanced motion animation features.
So knowing what libraries/methods are available in React.js, I decided to rewrite my previous project "How to Create an Animated Login Register Web Page With HTML, CSS3, and Javascript" in React.js and React-spring.
I have made a tutorial video on this, you can see the full video here:
Create animated login register form in react.js and react-spring.
The design and layout
For animations, I have in past used css method and React-transition-group, so this time I decided to explore something more advanced. For this reason, I chose react-spring as the primary method to implement the animation for this react demo. The design of the demo is shown below:
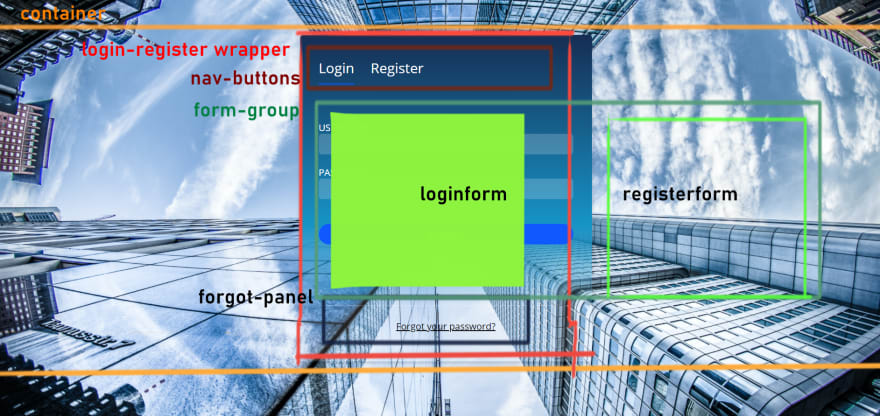
The design can be broken down into a grid-like layout with reference to the HTML elements that we would need to achieve that layout , this is particularly useful, because it allows me to identify what sections/components/containers I would need in my react app. See below for the break down:
From the above we can code a skeleton layout in HTML as below, note that this is the same structure as my previous demo.
<div className="container"> <div className="login-register-wrapper"> <div className="nav-buttons"> <button id="loginBtn" class="active">Login</button> <button id="registerBtn">Register</button> </div> <div className="form-group"> <form action="" id="loginform"> </form> <form action="" id="registerform"> </form> </div> <div id="forgot-panel"> </div> </div> </div>
Note: I have used JSX "className" other than that, its just standard HTML.
For the animation side of things, we will be animating the positions of the login form and the register form. The forms will slide in to focus depending on the button that has been clicked ie register or login button. The buttons will have a fade-in fade-out bottom border that toggles between button clicks.
Our app structure
After you create the boilerplate app using create-react-app and do the necessary cleaning up, we can use the above skeleton code as the main structure of our app, as shown below:
import React, { useState } from "react";
import "./App.css"; function App() { return ( <div className="login-register-wrapper"> <div className="nav-buttons"> <button id="loginBtn" class="active">Login</button> <button id="registerBtn">Register</button> </div> <div className="form-group"> <form action="" id="loginform"> </form> <form action="" id="registerform"> </form> </div> <div id="forgot-panel"> </div> </div> );
}
Next, Install react-spring by typing the command "install react-spring", then in the app.js, make sure you have the following import commands for react-spring.
import React, { useState } from "react";
import { useSpring, animated } from "react-spring"; // react-spring
import "./App.css";
Note: the the component useSpring and animated are loaded from the react spring module.
A bit about react-spring basics
Referring to the react-spring api, a simple animation that fades in and out when clicking a button will look like:
import React, { useState } from "react";
import { useSpring, animated } from "react-spring"; function App() { const [toggle, setToggle] = useState(true); const props = useSpring({ opacity: toggle ? 1 : 0, }); return ( <div> <animated.div style={props}> This content will fade in and fade out when you press the toggle button </animated.div> <button onClick={() => setToggle(!toggle)}>Toggle</button> </div> );
} export default App;
The concept here is that we define our spring animation for the opacity with something like :
const props = useSpring({ opacity: toggle ? 1 : 0, });
this acts as a hook and will get executed when the value of the toggle changes ie when the button is clicked. Notice that we have a ternary expression "toggle ? 1 : 0", this is the toggle mechanism. Then in the view we do two things, first prefix the HTML element we want to animate with "animated", and then set the style property to the animation we defined in "props" :
<animated.div style={props}> This content will fade in and fade out when you pree toggle button </animated.div>
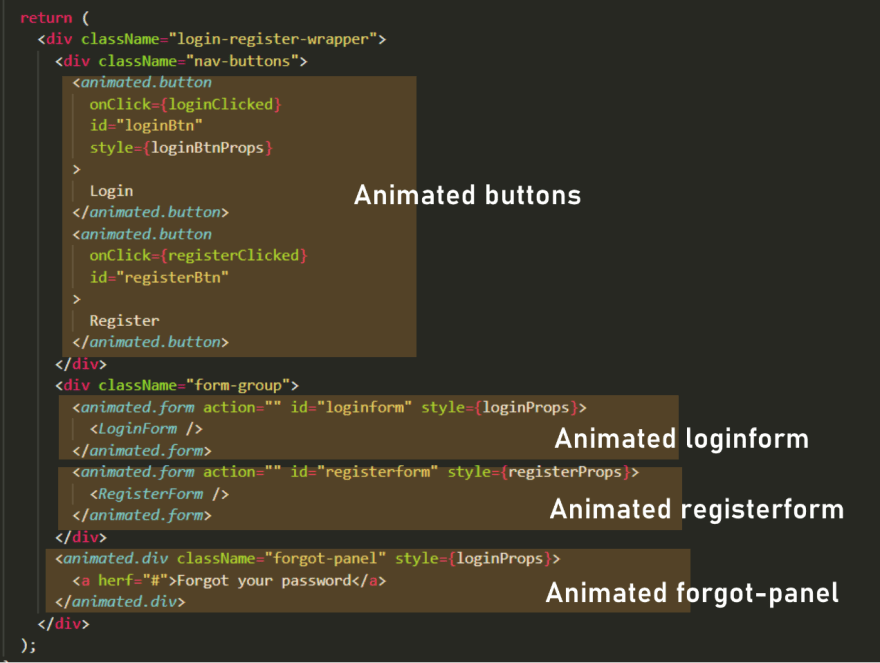
Our app view with animated wrappers ....
Now we know how to animate single items, we can rewrite our view for our demo app to include the animated wrappers and the animated properties for the style:
and the animated properties that we feed into the styles will be:
const loginProps = useSpring({ // animatimg login form left: registrationFormStatus ? -500 : 0 }) const registerProps = useSpring({ // animatimg register form left: registrationFormStatus ? 0 : 500 }) // animatimg buttons const loginBtnProps = useSpring({borderBottom: registrationFormStatus ? 'solid 0px transparent' : 'solid 2px #1059FF'}) const registerBtnProps = useSpring({borderBottom: registrationFormStatus ? 'solid 2px #1059FF' : 'solid 0px transparent'})
As you can see we are toggling the left position of the forms. loginProps contains the animation property for the login form. The login form is given left position -500 if the registration button is clicked therefore goes out of view because it is in the overflow region. But when the login button is clicked the login form is restored to position 0 and is seen again. The constant registerprops contains the animation values for the registration form. The registration form is moved to position 500 to hide it and moved to position 0 to slide into focus. The constants loginBtnProps and registerBtnprops contains the animation properties for the two buttons.
Conclusion
I have only touched the service with react-spring, and I thought it was quite easy to implement our simple example. We used 'useSpring()' hook to animate a single item. But react-spring offers much more complex hooks, see the list quoted on the react-spring API docs:
- useSpring a single spring, moves data from a -> b
- useSprings multiple springs, for lists, where each spring moves data from a -> b
- useTrail multiple springs with a single dataset, one spring follows or trails behind the other
- useTransition for mount/unmount transitions (lists where items are added/removed/updated)
- useChain to queue or chain multiple animations together


