How I Built a Reverse Image Search with Machine Learning and TensorFlow: Part 2
Welcome Back
I’ve been making some TensorFlow examples for my website, fomoro.com, and one of the ones I created was a lightweight reverse image search. While it’s fresh in my head, I wanted to write up an end-to-end description of what it’s like to build a machine learning app, and more specifically, how to make your own reverse image search. For this demo, the work is ⅓ data munging/setup, ⅓ model development and ⅓ app development.
At a high-level, I use TensorFlow to create an autoencoder, train it on a bunch of images, use the trained model to find related images, and display them with a Flask app.
In the last post, I talked about project setup and data munging. Now that that’s out of the way, I’m going to dive into . For this project I’m using an autoencoder model with 6 encoding and 6 decoding layers.
Ready? Let’s get started...
Model Creation
For those of you who aren’t familiar with them, autoencoders are networks that learn an identity function. In other words, what goes in should be close to what comes out. Initially, that doesn’t seem very useful because you already have the original, why make a fuzzy copy of it?
Well, you can picture the network as an hourglass. The first layers progressively compress the outputs and the last layers expand them back out. The magic happens in the middle where we have a compressed representation that still encodes enough information to recreate the original.
In this case, I’m forcing the layers of my model to learn more-and-more abstract (compressed) representations of the original image (encoding). I use that encoding to expand back out to a new full size image (decoding). Compression is a common proxy for abstraction. If I give my layers progressively less and less space for information, it forces them to learn higher level features.
It’s that highly abstracted middle layer that we will eventually use to evaluate all the images and find related images. It’s more robust than using the originals because we’ll be comparing features to features instead of pixels to pixels.
def model_fn(features, labels, mode):
    "Return ModelFnOps for use with Estimator."

    encoded_image = encoder(features["image"])
    decoded_image = decoder(encoded_image)

    loss = get_loss(decoded_image, labels["image"], mode)
    train_op = get_train_op(loss, mode)

    predictions = {
        'encoded_image': encoded_image,
        'decoded_image': decoded_image
    }
Trade-Offs
Autoencoders learn in an unsupervised manner. Most machine learning models are supervised (i.e. they use labels to tell them what the correct answer is). Even for this project, it’s likely that a supervised classifier model would produce better results, but I’m still choosing to use an unsupervised one. Why?
Well, it’s all about trade-offs. If I was really trying to push robustness, I’d use labeled data, so the model would have semantic information about the images. However, I’d need a wide variety of classes (labels) in sufficient numbers. So if I wanted to use just the bridges dataset that I’m currently using, I’d have to go in an add granular labels or possibly divide it into different types of bridges (e.g. suspension or truss). That sort of stuff takes either a bunch of money or time, often both. Plus, it would probably mean longer training times. I could also probably get an off-the-shelf pre-trained classifier to work, but where’s the fun in that? I like making my own models.
Also, take another look at the code above. There’s something to be said for its simplicity. Machine learning models should be no more complicated than they need to be. A common mistake is conflating layers with robustness. While models which run over huge datasets absolutely need to be large and deep, many don’t, and actually lose performance the more complex they are.
Encoding Layers
The encoding layers are a just a bunch of 2D convolutional layers stacked on top of each other. It’s difficult to learn large shifts in abstraction, so I couldn’t just go from the original image straight to the final embedding. Instead, I halve the output size each time by striding over the inputs. While I’m reducing the inputs, I’m also increasing the features that I’m forcing the encoder to learn at each layer. Eventually, the encoder learns to rely on these features to create an accurate embedding as opposed to relying on the raw pixel data. What I return from the encoder (layer_6) is what I’m eventually going to use to compare images to each other once I have a trained model.
Comparing abstract representations is more useful than comparing pixels between images. When people decide if two images are similar, we don't care if pixel A is more blue than pixel B or whether image X is darker than image Y. We look for concepts and overall similarity, not exact matches. The same thing applies to neural networks.
def encoder(inputs):
    layer_1 = tf.layers.conv2d(
        inputs=inputs,
        kernel_size=3,
        strides=2,
        filters=16,
        padding='SAME',
        activation=tf.nn.relu) # 128
    layer_2 = tf.layers.conv2d(
        inputs=layer_1,
        kernel_size=3,
        strides=2,
        filters=32,
        padding='SAME',
        activation=tf.nn.relu) # 64

    ...

    layer_6 = tf.layers.conv2d(
        inputs=layer_5,
        kernel_size=3,
        strides=2,
        filters=512,
        padding='SAME',
        activation=tf.nn.relu) # 4
    return layer_6
Decoding Layers
The decoder is very similar to the encoder. The main difference is that I transpose the convolutional layer and expand it by two each time. The final output size needs to match the size of the original image, but since I started with 256x256 pixel images the math is nice and clean. The other detail to notice is that the very last layer has a tanh activation instead of the standard ReLU activation. ReLUs have a range of 0 to inf., while tanh activations are scaled from -1 to 1. Since I scaled my original input tensor and the output needs to match the input, the final layer needs to be -1 to 1.
def decoder(inputs):
    layer_1 = tf.layers.conv2d_transpose(
        inputs=inputs,
        kernel_size=3,
        strides=2,
        filters=512,
        padding='SAME',
        activation=tf.nn.relu) # 8
    layer_2 = tf.layers.conv2d_transpose(
        inputs=layer_1,
        kernel_size=3,
        strides=2,
        filters=256,
        padding='SAME',
        activation=tf.nn.relu) # 16

    ...

    layer_6 = tf.layers.conv2d_transpose(
        inputs=layer_5,
        kernel_size=3,
        strides=2,
        filters=3,
        padding='SAME',
        activation=tf.tanh) # 256
    return layer_6
Loss and Training Functions
The last two functions in model.py are my training and loss operations. They are pretty straightforward. For both of them, I return none unless I’m actively training the model. I’m using a simple static learning rate of 0.01 and an Adam optimizer for training. Adam optimizers are useful because they can be less sensitive to hyperparameter tuning then a gradient descent optimizer. They use an adaptive learning rate and set the per-parameter learning rate dynamically. By using an Adam optimizer, I’m getting a learning rate that adjusts a little bit automatically as long as I get start in the right range.
For a lot of model development, that starting range really matters, so I generally use a command line argument instead of hard-coding it like I’m doing below. Once I’m familiar with a model (like this one) I can get away with just setting and forgetting, but best practice would be to pass it in.
def get_train_op(loss, mode):

    …

    global_step = tf.contrib.framework.get_or_create_global_step()

    train_op = tf.contrib.layers.optimize_loss(
        loss=loss,
        global_step=global_step,
        learning_rate=0.01,
        optimizer='Adam')

    return train_op
Training
Now for the fun part. After all that setup, I’m finally ready to start training. Since my data is in my default location, the only command line argument I need to pass in is where I’m going to store the results of the training run. I’m using a new directory called “logs”. Checkpoints get saved there as well, which is handy because I can stop and restart training if I need to.
# command to kick off a training session
$ python -m imagesearch.main --job-dir logs
I like to see a lot of messages when I’m training, so I’m logging the loss every 100 steps. That way I can tell if my model is doing more or less the right thing early on and make adjustments as needed. I also added an image summary to my model.py file (line:147) which allows me to monitor the results in TensorBoard. It’s nice to be able to visually inspect the results. To see them, I open up a new terminal tab and startup the server.
# kick off TensorBoard in a new tab
$ python -m tensorflow.tensorboard --logdir=logs
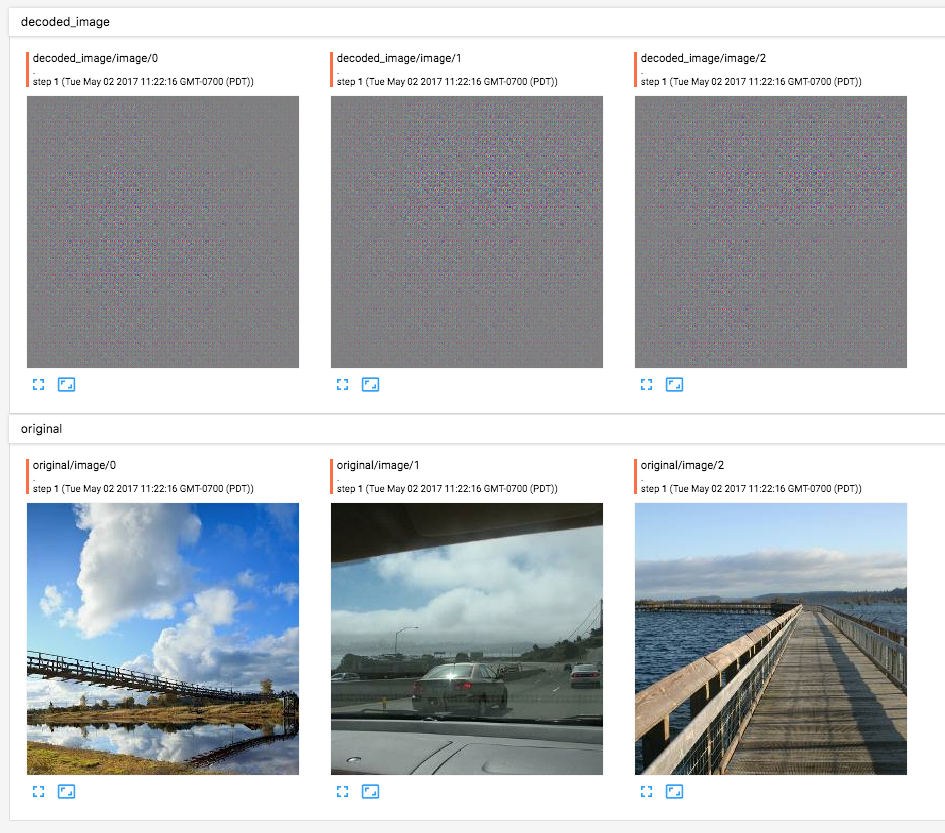
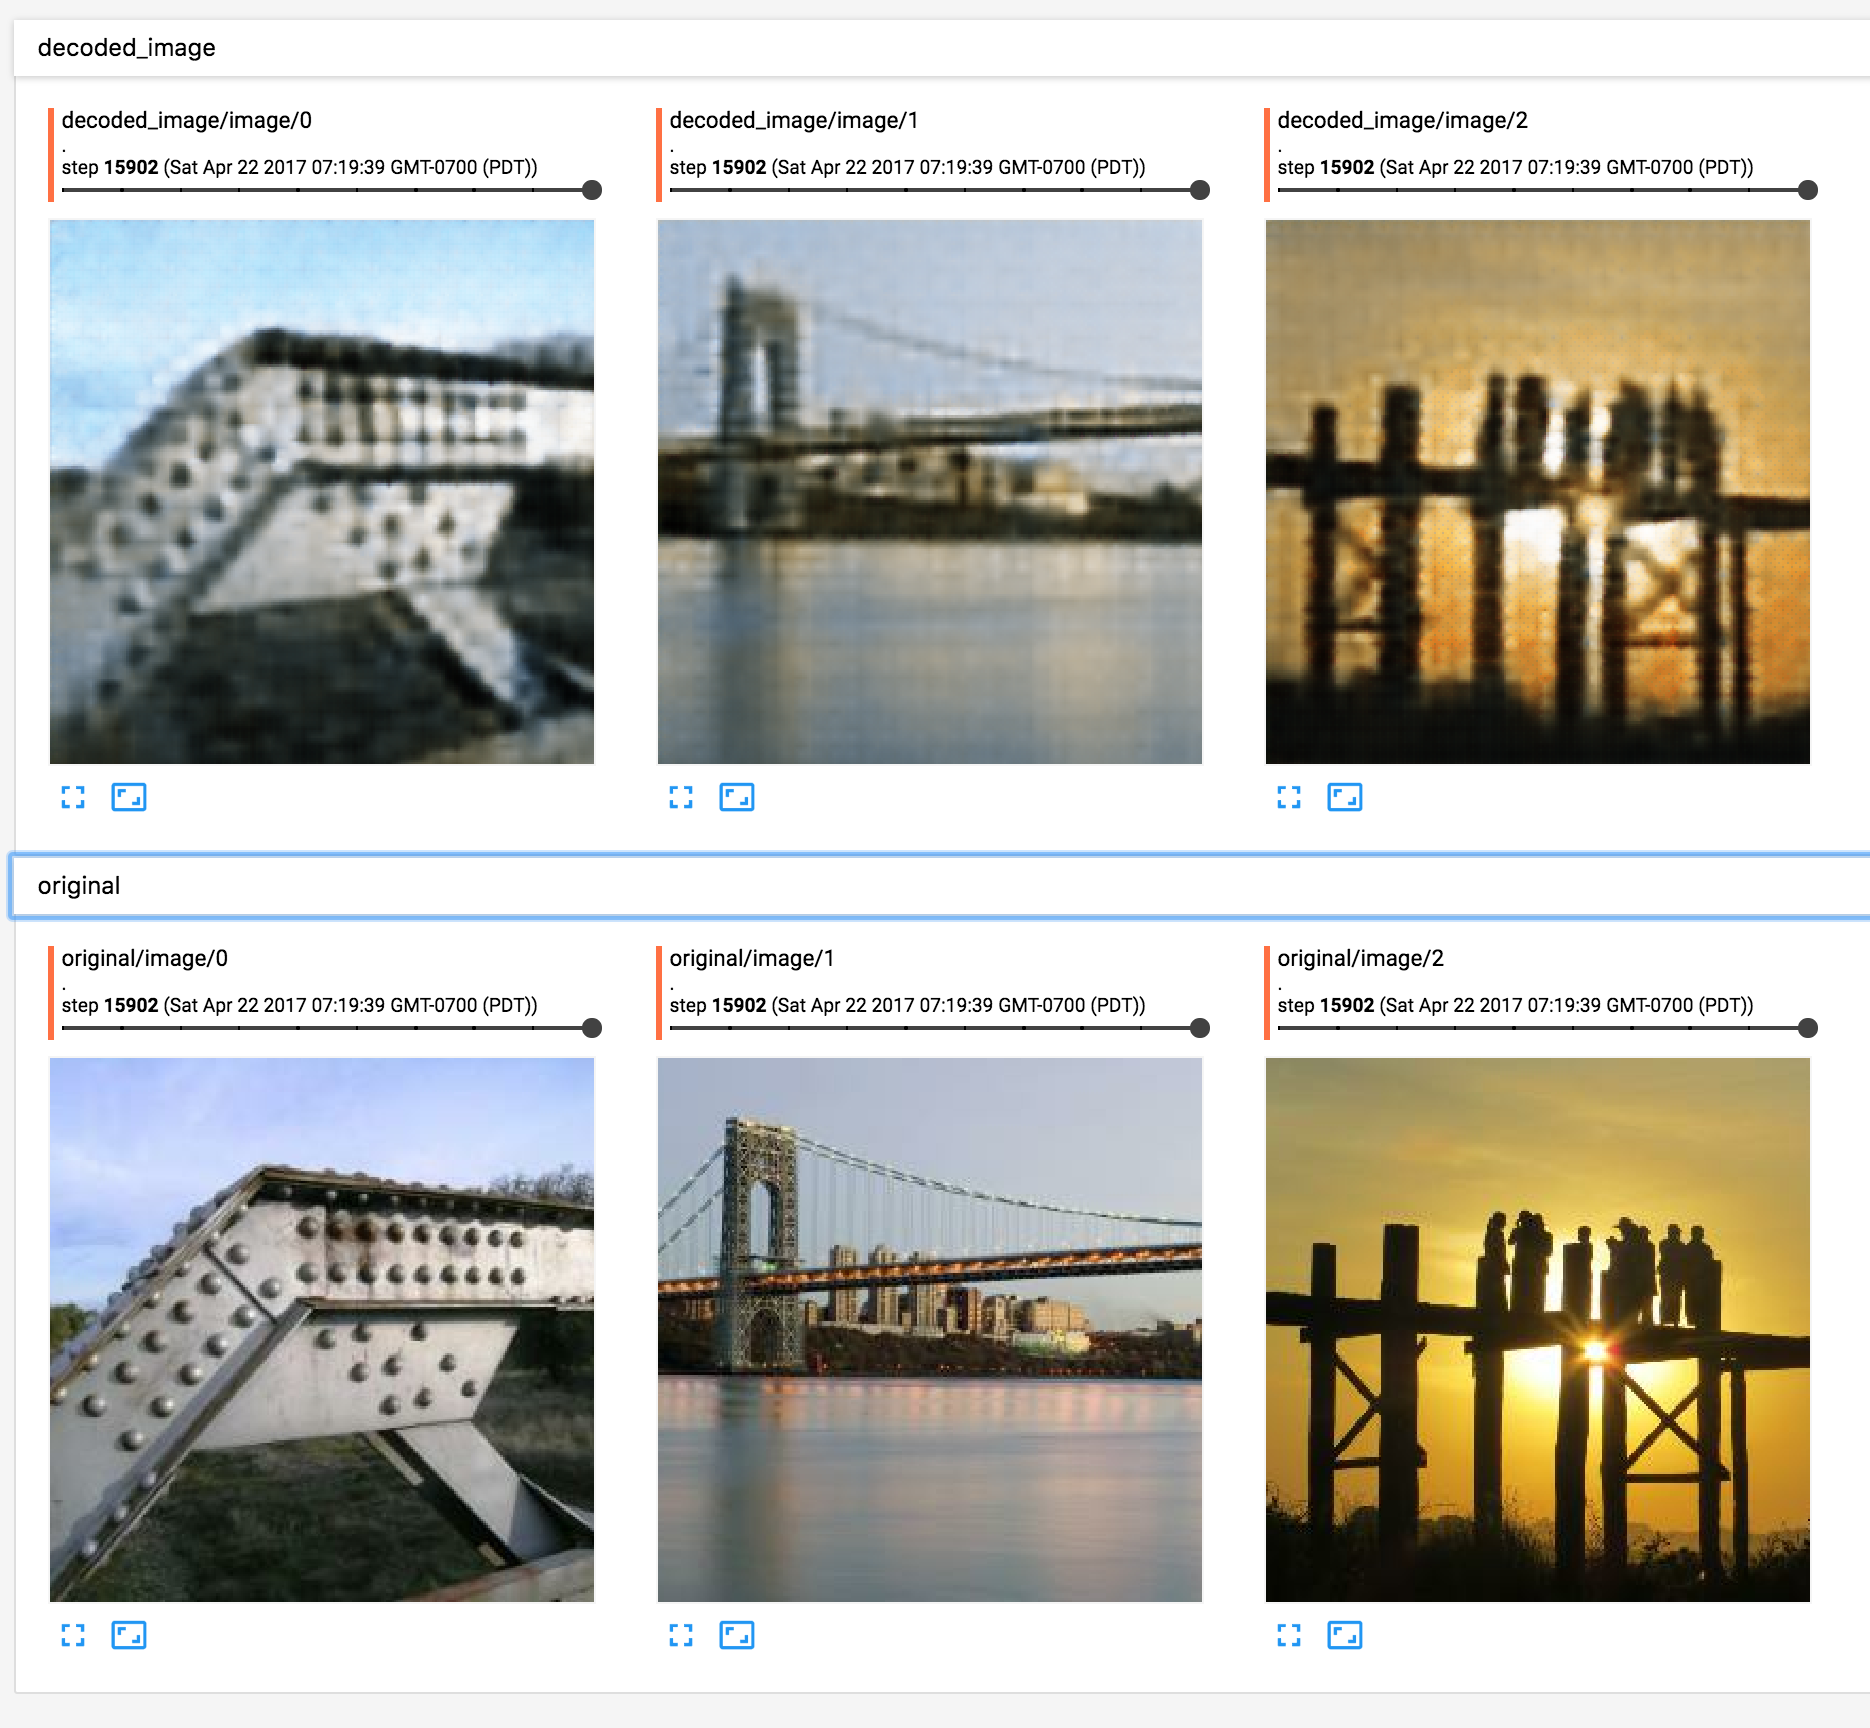
Here’s a comparison of TensorBoard screenshots from the beginning of training and the end of training. You can see how they go from looking like random noise to pretty accurate reconstructions. The decoded images are always going to be a bit blurrier than the originals, since we’re throwing away information when we stride over our layers. For my use case, I only need images that come close to reconstructing the originals since it’s really the embeddings I care about.
Start and Finish:


Wrap Up, Again For Now…
Thanks for sticking with me so far. It was a lot of stuff to pack in, deciding on what model to use, reviewing the tradeoffs, developing an autoencoder, and finally training it and watching the progress with TensorBoard.
So what’s next? I’ve got a trained model, but how do I do anything useful with it? Read Part 3 where I talk about how to take our model and use it in an app.
Questions? Comments? Let me know in the comments, or hit me up on Twitter: @jimmfleming

Hi, thanks for a great post. I have a question about the training data - the main script asks for two buckets of images, “train-data” and “eval-data”.
Are they different? Did you use the same photos of bridges for both? Or one is bridges and one is ‘not-bridges’? Or one is a small sample like ‘100 random bridges’ and the other is ‘all the (other) bridges’ ?
Thanks!
Hi,
I’m Samar
How to control 3 relays
2 DC motor
5 servo motor
With arduino Uno . With remote control
Please send the circuit diagram on this email = spsingh.gni@gmail.com
This system will be wireless