What the F**tter!? Understanding Flutter as an Android (Java) Developer
So if you are not living under a rock, you probably heard about Flutter and the buzz surrounding it.
The response from general audience of developers is a mixed one and not to blame them, it’s pretty obvious considering the fact that we just found a language (❥otlin) that we couldn’t stop loving, and out of the blue, the big “G” drops yet another framework (and language) that you can develop Android (and iOS) apps in.
Yes you heard me right, with Flutter, you won’t be able to develop apps in Java/Kotlin instead you’ll have to learn Dart (yeah I didn’t know about it before either) which is another language by google.
So out of curiosity and as someone who never wrote JS before (real coders code in assembly!), I decided to give Flutter and Dart a shot and see how good/bad things really were with this new tool that we have in our arsenal.
Here’s a live look into my journey and the mysteries I unravelled in the process, hang tight!
Note : I won’t be getting into the debate on which language is better than the other, this blog is just a walkthrough of how I understood the structure of an app built in flutter using my existing knowledge as an Android Developer.
Episode 1 : Getting started
This was pretty straightforward, I just went to the official flutter website and followed the instructions listed there (https://flutter.io/get-started/install/).
Note : You don’t actually need libimobiledevice , ideviceinstaller, ios-deploy and CocoaPods unless you want to build an iOS app, so ignore flutter doctor’s advice on installing them and you’ll save a hell lot of a time.
Next up I installed the Flutter Plugin in Android Studio and went ahead onto creating a new Flutter Project.
Episode 2 : Getting hands dirty with Code
Now once the installation is out of the way, I was exposed to the mystical world of Dart.
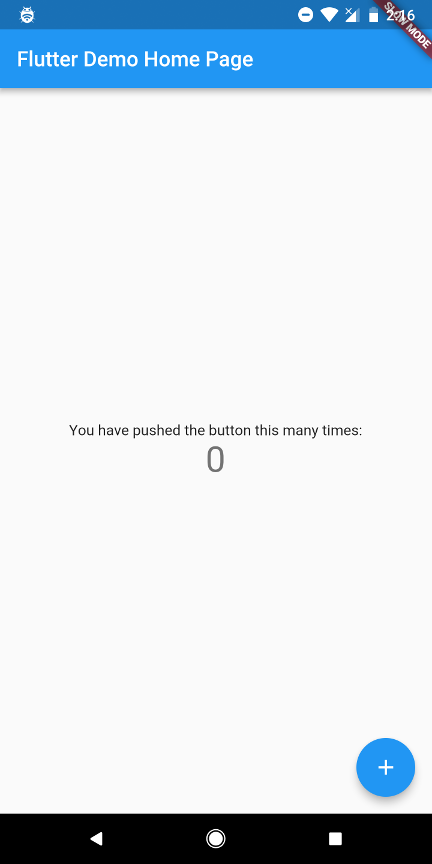
This is how the app looks when I run it for the first time :

Pretty simple, right?
Clicking on the fab increments the text that says 0 and that’s about it.
Let’s get to the fun part.
Upon taking a look at the code, my OCD started kicking in as I saw the Main file named main.dart instead of Main.dart , but I decided to give it a pass and move on.
I could see some familiar remnants of Java and Kotlin here in Dart ( classes , Objects , multiple root classes, etc.) but the thing that caught my eye was the
void main() => runApp(new MyApp());
method at the very top which reminded me of the good old C++ days.
This turns out to be the entry point to our Application.
All this method does is call the runApp() method which seems to play the role of setContentView() and displays the specified widget on the screen.
Below that we have our actual MyApp class.
MyApp can be thought of the Application Class here which encloses multiple Widgets in it.
MyApp extends a StatelessWidget (In Flutter, almost everything is a widget) i.e. more jargon just thrown at your face.
My first instinct was to open stackoverflow to find out what this meant, which led me to the docs and quoting them here :
State_less_ widgets are immutable , meaning that their properties can’t change — all values are final.> State_ful_ widgets maintain state that might change during the lifetime of the widget.
Ok makes sense, it’s similar to val and var in Kotlin (or final in Java)
Inside MyApp, we have overridden the build() method which is responsible for describing how to display that particular widget.
Similar to our Application class, here we create and return an object of the MaterialApp class which ensures that our Application will have a Material Look and feel.
You can see some familiar names here like the title and the theme which again affect the label of our Application and the ActionBar’s look and feel.
Moving on, we have a new home variable which sets MyHomePage as the Widget that will be shown in the MyApp widget.
So this MyHomePage widget can be thought of as an Activity here.
The MyHomePage takes in a String which seems to be the Toolbar title for this Activity.
Do note that there are no Activities here, only Widgets!
Below the MyApp class, we have the MyHomePage class:
Now, when we say that the MyHomePage is a StatefulWidget , it means that it has a State object (defined below) that contains fields that affect how it looks.
The job of this class in particular is to hold the values (in this case the title) provided by the parent (in this case the App widget) so that it can be used by the State widget we implement later on.
(They’re really making things easy, aren’t they? :sarcasm:)
Anyways, moving on, it looks like the createState() method creates an instance of and defines the UI class for this widget.
P.S. Notice the one line functions Dart has (=>) similar to Kotlin’s expression functions.
Moving on the the actual class that implements the UI in our app:
So the _MyHomePageState class extends a generic class called State.
This State Class contains the logic and internal state for a StatefulWidget (here MyHomePage ).
Since our app here is a counter, clicking on the FAB increments the count on the screen.
We need a variable to store the value of this count and a method which updates this variable.
We can see both of them as the first two members of this class.
If you notice carefully, you can see a method setState() inside _incrementCount().
The functionality of setState() is to Notify the framework that the internal state of this object has changed and then update the widgets and that’s what it does here!
Moving on the the build() method, this is the method that defines how my widget is going to look
Don’t be afraid, get some coffee.
My friend, this is going to be a long ride!
So the method does a single thing, i.e. returns a new Scaffold object. (Another Jargon, duh!)
Going back to the earlier process, I again arrived at the flutter website where a Scaffold is listed as :
The Scaffold widget, from the Material library, provides a default app bar, title, and a body property that holds the widget tree for the home screen. The widget subtree can be quite complex.
Alright, makes sense!
So we proceed to add a new appBar to and set the title to the text stored inside the MyHomePage class.
Remember when we said that this is going to be a placeholder for the values it received from the parent? Well, that’s what we did here, we got an access to the parent of this State and got the title from there.
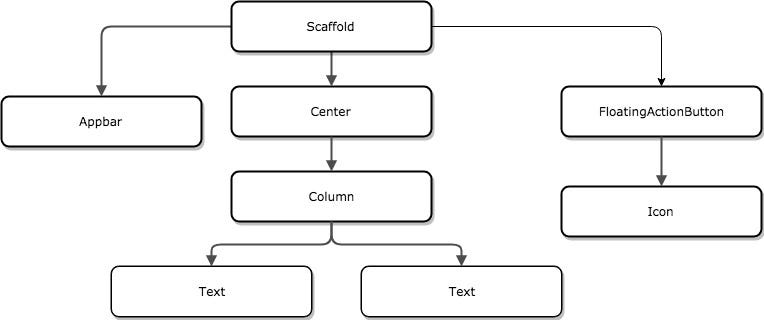
Next up, we set the body as Center.
The Center here essentially is the xml part of layout building that we are used to in traditional Android Development.
It takes a single child and positions it in the middle of the parent, so somewhat similar to a Layout with a central gravity.
It has a child named Column which arranges its children vertically (the horizontal width being match_parent) and as you guessed, there’s another class named Row that arranges its children horizontally.
Somewhat similar to the Vertical and Horizontal LinearLayouts , neat!
We have a mainAxisAlignment key which basically tells the gravity for the Column class.
In the starter code, its set to Center and hence the content starts from the center.
Lastly we have an Array of Widget that define the content that’ll be inside this Column block.
And as you guessed, these are our 2 Text (our beloved TextViews) that show the number of times we have pressed the FAB.
Speaking of FAB, we have a third widget outside of the Center and Appbar blocks, our FAB.
It has an onPressed method, (reminds you of onClick , doesn’t it?), a tooltip attribute (which refers to the contentDescription ) and an Icon which replicates the src/srcCompat attribute of the FAB.

The overall UI structure looks somewhat like this.
It uses less lines of code than XML, true but it can be daunting for newcomers to the platform.
Episode 3 : The conclusion
Well, while flutter looks cool and the Hot reload is pretty fast indeed, is it worth the switch?
According to me, now isn’t the time to go full on with flutter and start building all your apps on it .
Flutter is still in beta and there’s little to no reference available for it either on StackOverflow or anywhere else.
While it can be a promising platform in the near future, my only gripe would be the missed opportunity of Kotlin being used in the framework instead of Dart.

Match made in heaven?
So, I think that will be it for this one, I hope that you now have a high level understanding of how you can correlate flutter Framework with the traditional Android Framework that we know and love.
I’ll be exploring more of flutter in the upcoming weeks so expect some more blogs on me trying to wrap my head around it.
This blog was originally posted here.
Thanks for reading! If you enjoyed this story, please click the ❤️ button and share to help others find it! Feel free to leave a comment 💬 below.
Have feedback? Let’s be friends on Twitter.

Informative,I have been living under a rock!My heart cries for this sector.
Yh, I heard about flutter but I was kinda thinking it’s all gonna require nodejs-like configuration to get up and running and stuffs like that. But thanks for your post, I can briefly tell someone about it.