How to Implement Android Navigation Component in Android? (Tutorial)
From this Android navigation component tutorial, you will know:
- What is Android jetpack’s navigation component?
- Benefits of the navigation component
- When to use navigation component
- How to implement Android navigation component in your application
You must be hearing a lot about Android Jetpack, which is a set of components, tools and guidance to make great Android apps.
When it comes to talking about Android components, they are highly useful for Android developers while developing an app.
Components like Coroutine and Live Data, Data Binding, Paging, ViewModel, Security, Sharing, WorkManager for background jobs, and Navigation are the collection of libraries that are individually adaptable and built to work together. Among these components, WorkManager, Navigation and Paging are the new ones. Therefore, we are covering tutorials on these new components. Earlier, we covered WorkManager and now here we are covering Navigation.
But do you know what navigation is? What are the benefits of it? When to use this component? How to implement it in the Android app? Let us answer all these questions one-by-one.
What is Navigation?
Generally, navigation refers to the interactions, allowing users to navigate across, into and back out from different pieces of content within your application.
The newly launched Android Jetpack’s Navigation component is launched as a framework for structuring your in-app UI, focusing on making a single activity app. From simple button clicks to complex patterns like app bars and the navigation drawer, this component helps to implement navigation.
Moreover, this component also ensures a consistent and predictable user experience by adhering to an established set of principles. It consists of three parts that are described as follow:
-
Navigation Graph: It is an XML resource, which has all the information related to navigation in one centralized location. It comprises all the individual content areas within your app known as destinations.
-
NavHost: An empty container, showing destinations from the navigation graph. This component contains a default NavHost implementation, NavHostFragement that shows fragment destinations.
-
NavController: A single object which manages app navigation within a NavHost.
Moving ahead, let’s discuss the benefits of Android Jetpack’s Navigation component.
Benefits of Android Navigation Component
- It handles fragment transactions easily with its available API
- It allows checking the flow of application through navigation graph
- Provide standardized resources for animations and transitions
- It implements and handles deep linking
- It handles Up and Back actions correctly by default
To know about this component, you can refer to this Android development guide that is released by Google. In our Android app development tutorial, you will learn how to implement the Navigation component in your Android application.
Let’s Get Started
Step 1: First of all, add the dependency in the application module Gradle file (build.gradle).
dependencies {
def nav_version = "2.1.0"

// navigation
implementation "androidx.navigation:navigation-fragment-ktx:$nav_version"
implementation "androidx.navigation:navigation-ui-ktx:$nav_version"
}
Step 2: In the Project or Android Window, Right-click on the res directory and create a new Android Resource Directory with Resource Type As Navigation and Add new Navigation Resource File and name it whatever you want, this way your navigation graph will be created.
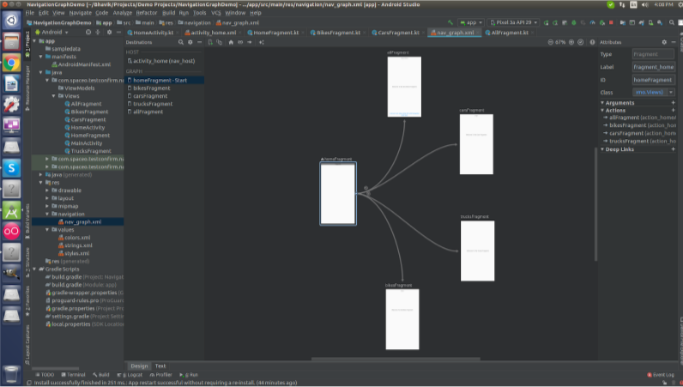
Your navigation graph will contain mainly 3 sections.
-
Destinations panel: Lists your navigation host and all destinations currently in the Graph Editor.
-
Graph Editor: Contains a visual representation of your navigation graph. You can switch between Design view and the underlying XML representation in the Text view.
-
Attributes: Shows attributes for the currently-selected item in the navigation graph.
Click the Text tab to see the corresponding XML of the Navigation Graph
Step 3: Now, take one fragment in your MainActivity in which you want to navigate to other fragments.
<fragment
   android:id="@+id/nav_host"
   android:name="androidx.navigation.fragment.NavHostFragment"
   android:layout_width="match_parent"
   app:defaultNavHost="true"
   app:navGraph="@navigation/nav_graph"
   android:layout_height="match_parent"
   />
Step 4: Now, create one other blank fragment to Navigate from Home Fragment to newly created fragment.
Step 5: Now, add both the fragments into Navigation Graph as shown in the figure.

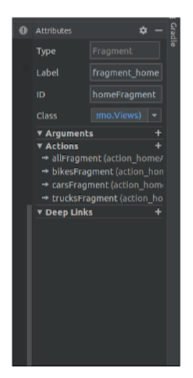
You can add Action, Arguments and Deep-link from Navigation itself, which will help to pass the data between Fragment while Switching. As shown in the figure.

All the Actions will define the transition and destination, in short, the route of the application through navigation. Arguments will define the default value to a particular key and Deeplinks will forward the user to a particular screen within the app.
Step 6: Now, in the Home Fragment, do the following code to your corresponding view’s on click event to navigate to the next fragment.
class HomeFragment : Fragment() {

   override fun onCreateView(
       inflater: LayoutInflater, container: ViewGroup?,
       savedInstanceState: Bundle?
   ): View? {
       val view = inflater.inflate(R.layout.fragment_home, container, false)

       if (view != null) {
           init(view)
       }

       return view
   }

   private fun init(view: View?) {

       view?.findViewById(R.id.tvShowAll)?.setOnClickListener {
//            val bundle = bundleOf("userText" to "John Connor")
           Navigation.findNavController(view).navigate(R.id.action_homeActivity_to_allFragment)
       }
 view?.findViewById(R.id.tvShowBikes)?.setOnClickListener {
           val bundle = bundleOf("userText" to "Jack Sparrow")
           Navigation.findNavController(view).navigate(R.id.action_homeActivity_to_bikesFragment, bundle)
       }

       view?.findViewById(R.id.tvShowCars)?.setOnClickListener {
           Navigation.findNavController(view).navigate(R.id.action_homeActivity_to_carsFragment)
       }

       view?.findViewById(R.id.tvShowTrucks)?.setOnClickListener {
           Navigation.findNavController(view).navigate(R.id.action_homeActivity_to_trucksFragment)
       }
   }
}
Step 7: After adding 3-4 fragments in your project and adding all of them into the navigation graph, your navigation graph’s design will look something like this.

And the text (XML) file of your Navigation Graph will look something like this.
<?xml version="1.0" encoding="utf-8"?>
<navigation xmlns:android="http://schemas.android.com/apk/res/android"
   xmlns:app="http://schemas.android.com/apk/res-auto"
   xmlns:tools="http://schemas.android.com/tools"
   android:id="@+id/nav_graph"
   app:startDestination="@+id/homeFragment">

   <fragment
       android:id="@+id/homeFragment"
       android:name="com.spaceo.testconfirm.navigationgraphdemo.Views.HomeFragment"
       android:label="fragment_home"
       tools:layout="@layout/activity_home">
       <action
           android:id="@+id/action_homeActivity_to_carsFragment"
           app:destination="@id/carsFragment"
           app:popEnterAnim="@anim/nav_default_pop_enter_anim"
           app:popExitAnim="@anim/nav_default_pop_exit_anim"
           app:popUpTo="@id/carsFragment" />
       <action
           android:id="@+id/action_homeActivity_to_allFragment"
           app:destination="@id/allFragment"
           app:enterAnim="@anim/nav_default_enter_anim"
           app:exitAnim="@anim/nav_default_exit_anim"
           app:popUpTo="@id/allFragment" >
<argument
               android:name="userText"
               app:argType="string"
               android:defaultValue="Hello World 2" />
       </action>
       <action
           android:id="@+id/action_homeActivity_to_bikesFragment"
           app:destination="@id/bikesFragment"
           app:popUpTo="@id/bikesFragment" />
       <action
           android:id="@+id/action_homeActivity_to_trucksFragment"
           app:destination="@id/trucksFragment"
           app:popUpTo="@id/trucksFragment" />

   </fragment>


   <fragment
       android:id="@+id/bikesFragment"
       android:name="com.spaceo.testconfirm.navigationgraphdemo.Views.BikesFragment"
       android:label="fragment_bikes"
       tools:layout="@layout/fragment_bikes" >
       <argument
           android:name="userText"
           app:argType="string"
           android:defaultValue="Hello World3" />
   </fragment>
   <fragment
       android:id="@+id/carsFragment"
       android:name="com.spaceo.testconfirm.navigationgraphdemo.Views.CarsFragment"
       android:label="fragment_cars"
       tools:layout="@layout/fragment_cars" >
       <argument
           android:name="userText"
           app:argType="string"
           android:defaultValue="Hello World1" />
   </fragment>
   <fragment
       android:id="@+id/trucksFragment"
       android:name="com.spaceo.testconfirm.navigationgraphdemo.Views.TrucksFragment"
       android:label="fragment_trucks"
       tools:layout="@layout/fragment_trucks" />
   <fragment
       android:id="@+id/allFragment"
       android:name="com.spaceo.testconfirm.navigationgraphdemo.Views.AllFragment"
       android:label="fragment_all"
       tools:layout="@layout/fragment_all">
   </fragment>
</navigation>
Output:
From this tutorial, you learnt to implement Android jetpack’s navigation component in your Android application. However, you also checked the basic information about this component like what it is and the benefits of this component.
Following this step-by-step tutorial, you can implement the Android navigation component without any hassle. In fact, you can refer to this demo and download the source code from Github.
